 Do Son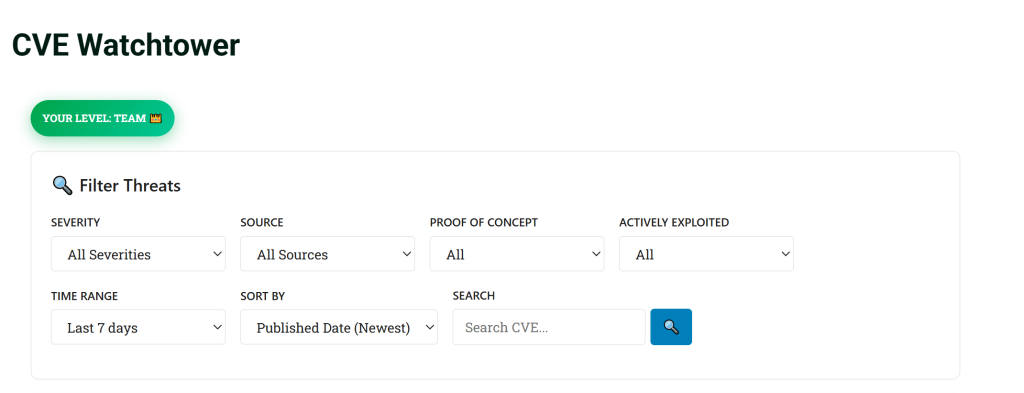
CVE Watchtower tracks new CVEs for the specific vendors and products you choose, scores them for severity and real-world exploitation, and emails you the moment one matters. This guide walks through the full path a new user takes: pick a plan, create an account, build a vendor watchlist, read the stats page, and understand the alerts you’ll start receiving.
Step 1: Choose Your Plan
CVE Watchtower offers three tiers. Open the Pricing page and compare them before signing up:
| Tier | What you get |
| Free | The public CVE Watchtower feed and detail pages, email alerts for CISA KEV matches and CVEs that cross your EPSS/CVSS threshold, a Vendor Watchlist. Admin-curated “Premium Threat Intelligence” CVEs (early zero-day/Reserved-but-Public advisories added by the CVE Watchtower team before NVD publishes them) show only the vendor name and an upgrade prompt — the CVE ID and description are hidden. |
| Pro | Everything in Free, plus full access to admin-curated/Reserved-but-Public CVE details (no blur), the “PatchThis” and “New CVE” alert channels, and a welcome email with your 10 most recent matching CVEs when your trial starts. |
| Team | Everything in Pro, plus support for a team/shared account and enterprise webhook delivery (push matching CVEs straight into your own ticketing or SOAR tool). |
- Unlimited vendors
- All new CVE alerts
- Exploit Intel (PatchThis)
- Custom EPSS threshold
- No ads on site
- Access to Daily CyberSecurity Team sources
 Buy Me a Coffee
- Everything in Pro
- Slack / Teams webhook
- GitHub Issues / Projects
- Team name in alerts
- CSV / JSON export
- Access to Daily CyberSecurity Team sources
Click Subscribe (or Start Free) under the plan you want.
Step 2: Create Your Account
- After picking a plan, you’ll land on the registration form. Enter your email address and choose a password.
- Free accounts are active immediately — no payment needed.
- For Pro or Team, pay using one of three supported methods: Buy Me a Coffee, Contribute with Google, or PayPal.
- None of these three methods are linked to your account automatically yet. After you pay, the CVE Watchtower team upgrades your account to Pro/Team by hand — it isn’t instant, so allow some time after payment before it takes effect.
- Use the same email address for payment as the one you registered with. That’s how the team matches your payment to your account; paying with a different email can delay or prevent your upgrade.
- Don’t want to pay up front? Every new account can start a 14-day free trial of Pro features first, no payment method required.
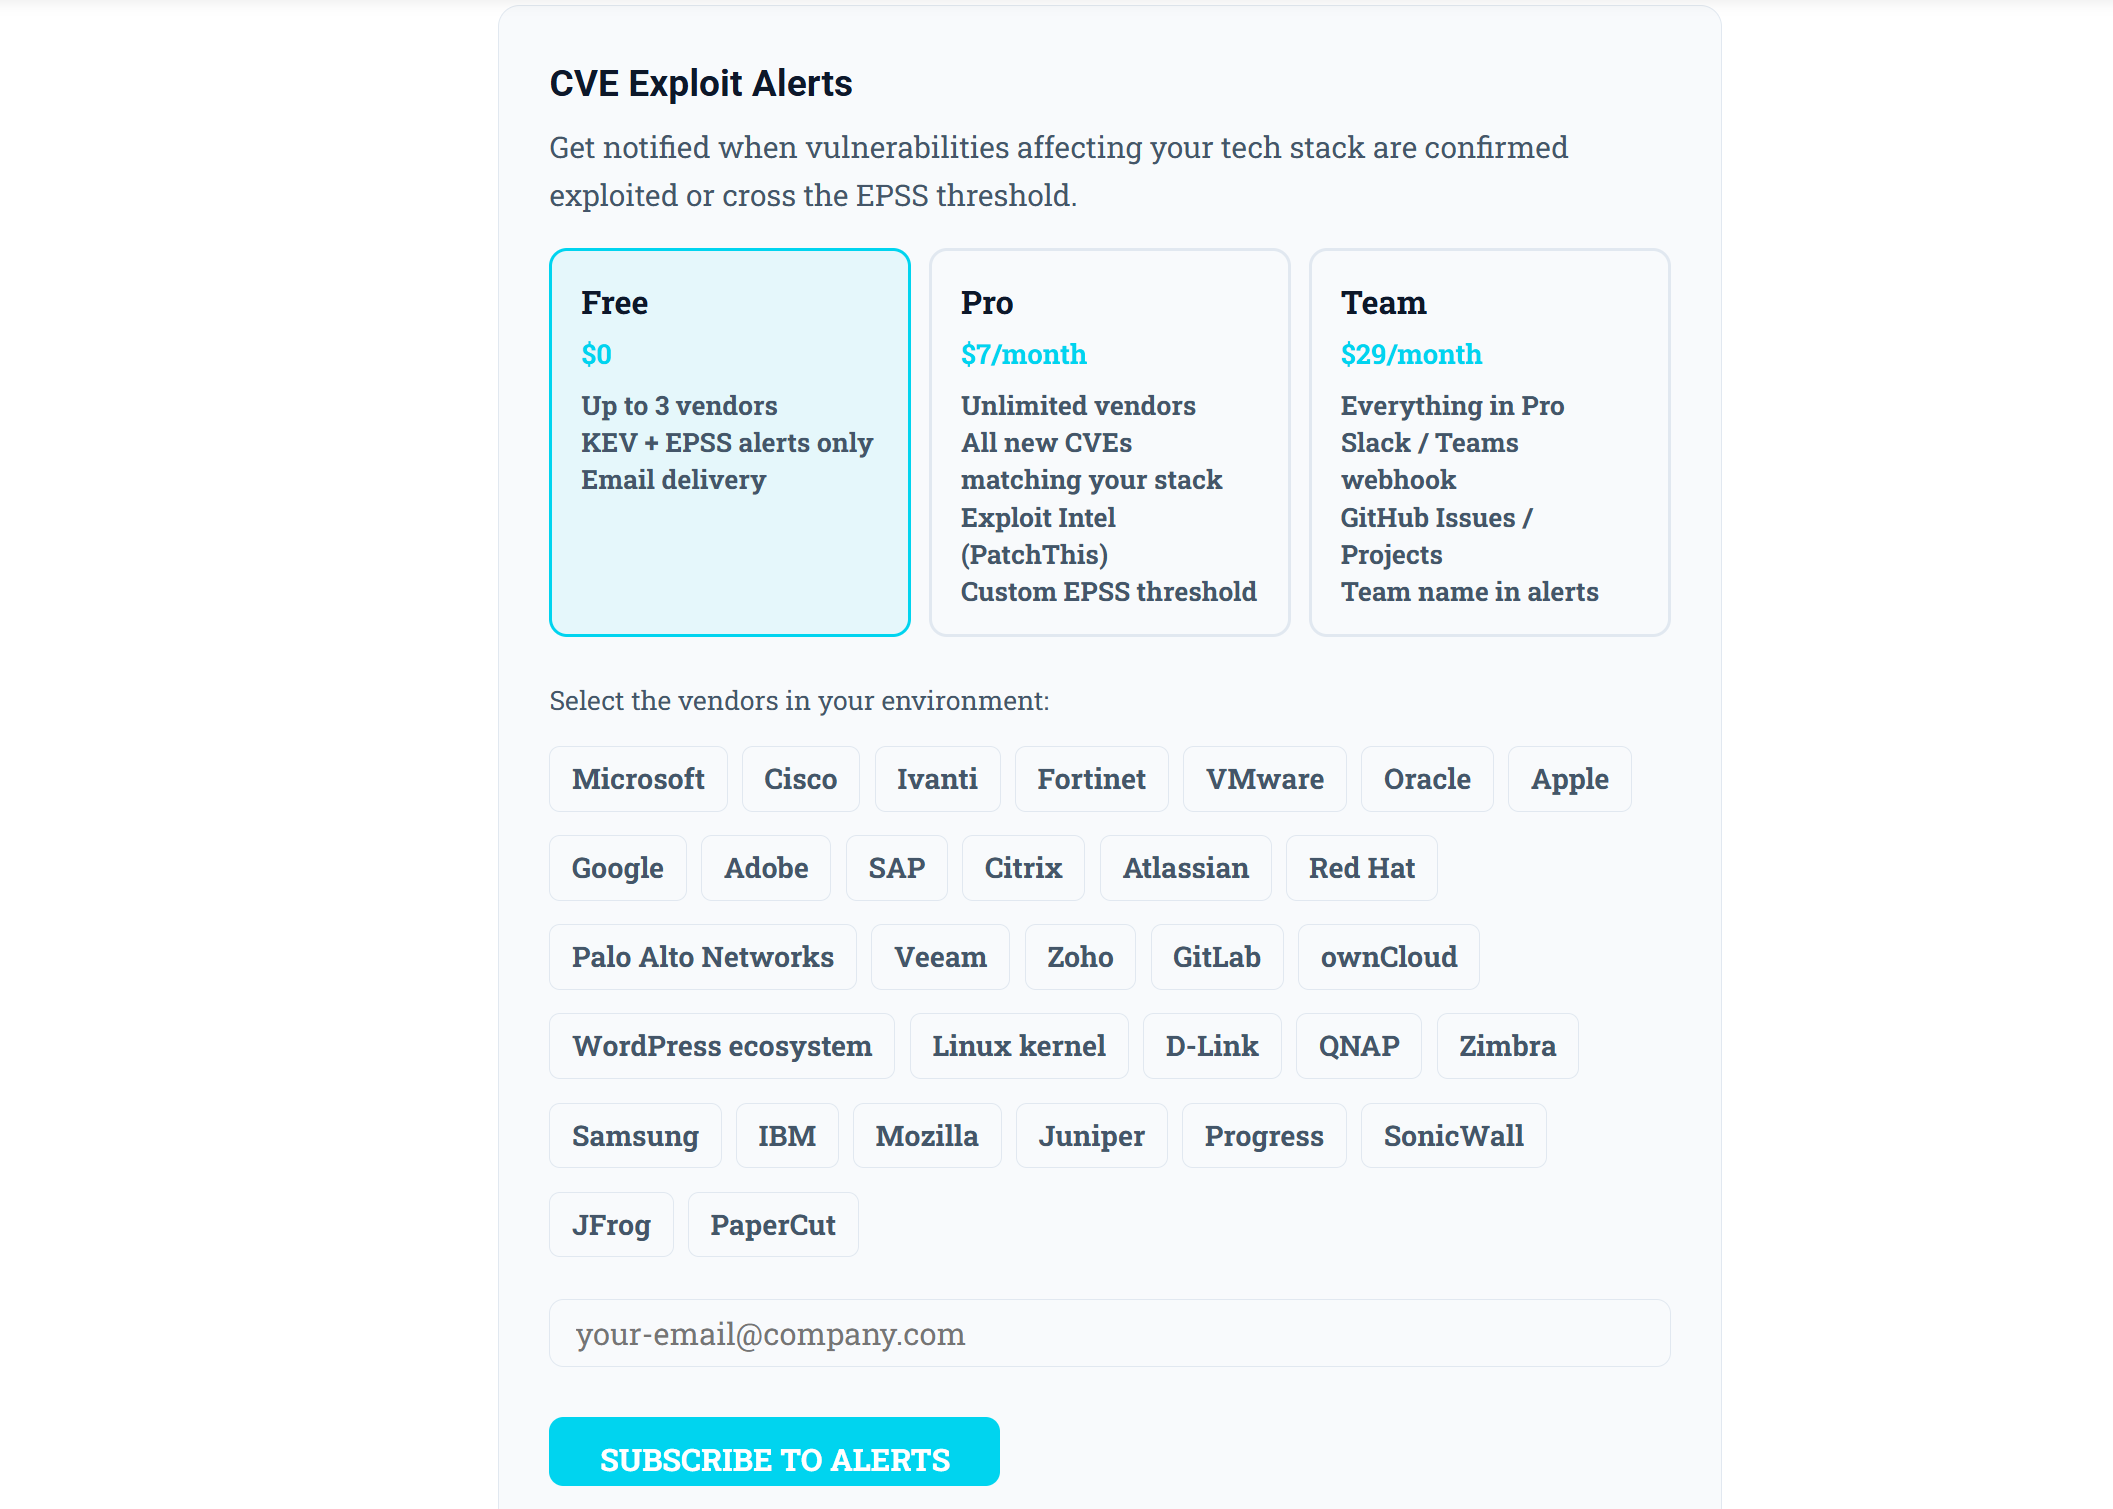
Once registered, log in and you’ll be taken to your account dashboard, where the CVE Alert Settings page is the control center for everything in the rest of this guide.
Step 3: Build Your Vendor Watchlist
Your watchlist decides which CVEs you get stats and alerts for — CVE Watchtower doesn’t email you about every CVE in the database, only ones matching a vendor you’ve added.
- Open the page with the CVE Alert Settings shortcode (your account dashboard links to it directly).
- Find the Vendor Watchlist section and add one or more vendors from the supported list (examples: Microsoft, Cisco, Ivanti, Fortinet, VMware, Oracle, Apple, Google, Adobe, SAP, Palo Alto Networks, and more).
- Save your changes.
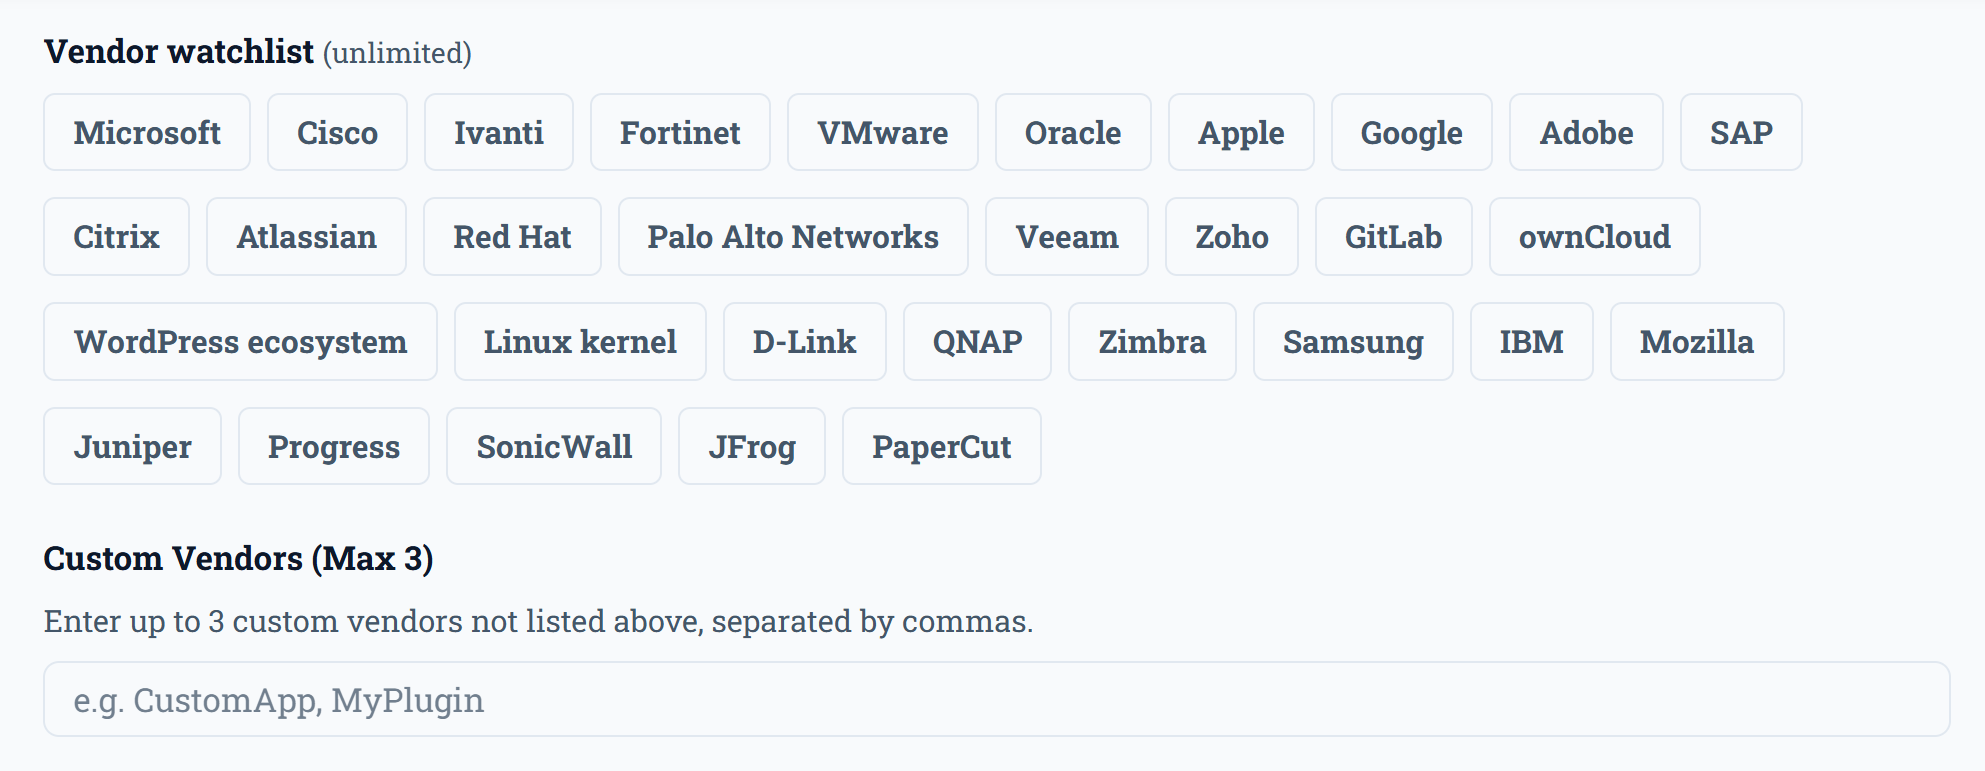
You can add or remove vendors at any time — changes apply to both future email alerts and the stats page in the next step.
Step 4: Configure Email Alert Settings
Still on the CVE Alert Settings page, set the two thresholds that decide which of your watchlisted CVEs are worth an email:
- EPSS score threshold — EPSS (Exploit Prediction Scoring System) estimates the probability a CVE will be exploited in the next 30 days. Raise it to hear about fewer, higher-probability CVEs; lower it to catch more.
- CVSS score threshold — the standard 0–10 severity score. CVEs below your threshold are tracked but don’t trigger an email.
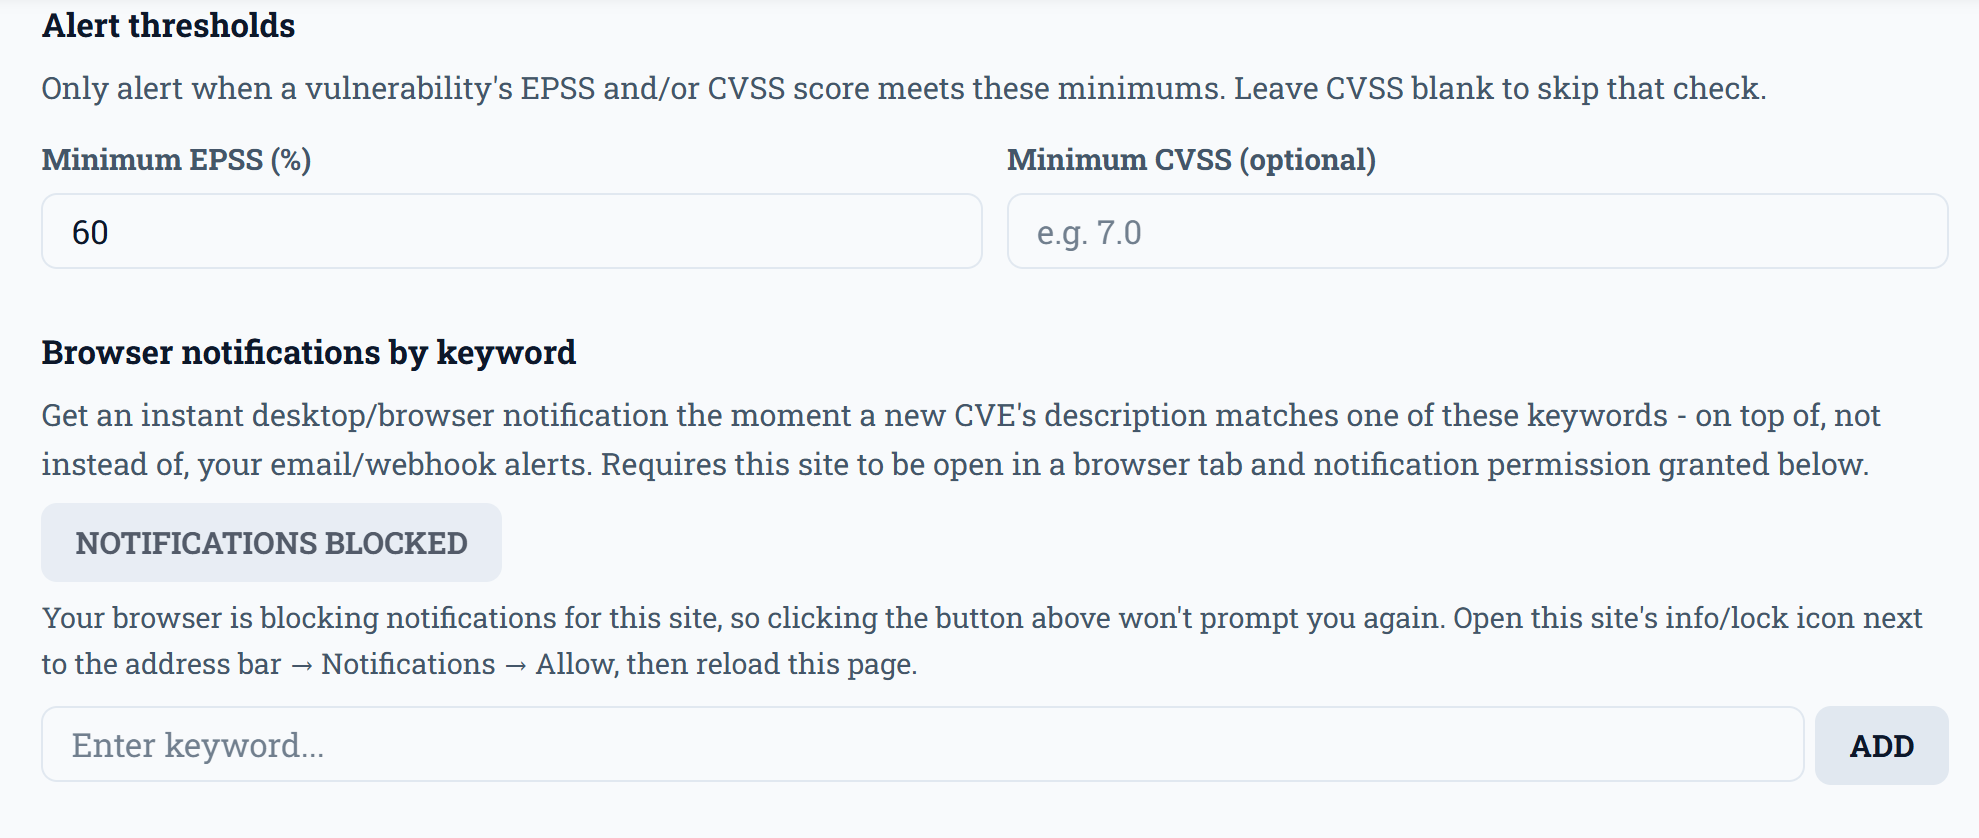
You’ll always be emailed for two things regardless of your thresholds:
- Any watchlisted CVE added to CISA’s Known Exploited Vulnerabilities (KEV) catalog.
- Any watchlisted CVE whose exploitation status flips to ACTIVE.
Save your settings — they take effect on the next scheduled sync, typically within the hour.
Step 5: Use Vendor Vulnerability Stats
The same CVE Alert Settings page includes a Vendor Vulnerability Stats panel, scoped to your own watchlist vendors only (not the full list of every vendor CVE Watchtower tracks).
- Click a vendor’s tab to see its last-30-days CVE activity. Each vendor also gets its own shareable link (e.g. adding #microsoft to the page URL opens straight to that tab).
- Three stat cards summarize the vendor: Total CVEs, Critical Severity, and Active Exploits.
- Hover or tap the Active Exploits number to see the exact CVE IDs behind it — each one is a clickable link to its detail page.
- The donut chart next to the stat cards breaks down the vendor’s CVEs by severity (Critical / High / Medium / Low) for the same 30-day window.
- Below the cards, a sortable table lists every matching CVE with its EPSS score, exploitation status, and severity.
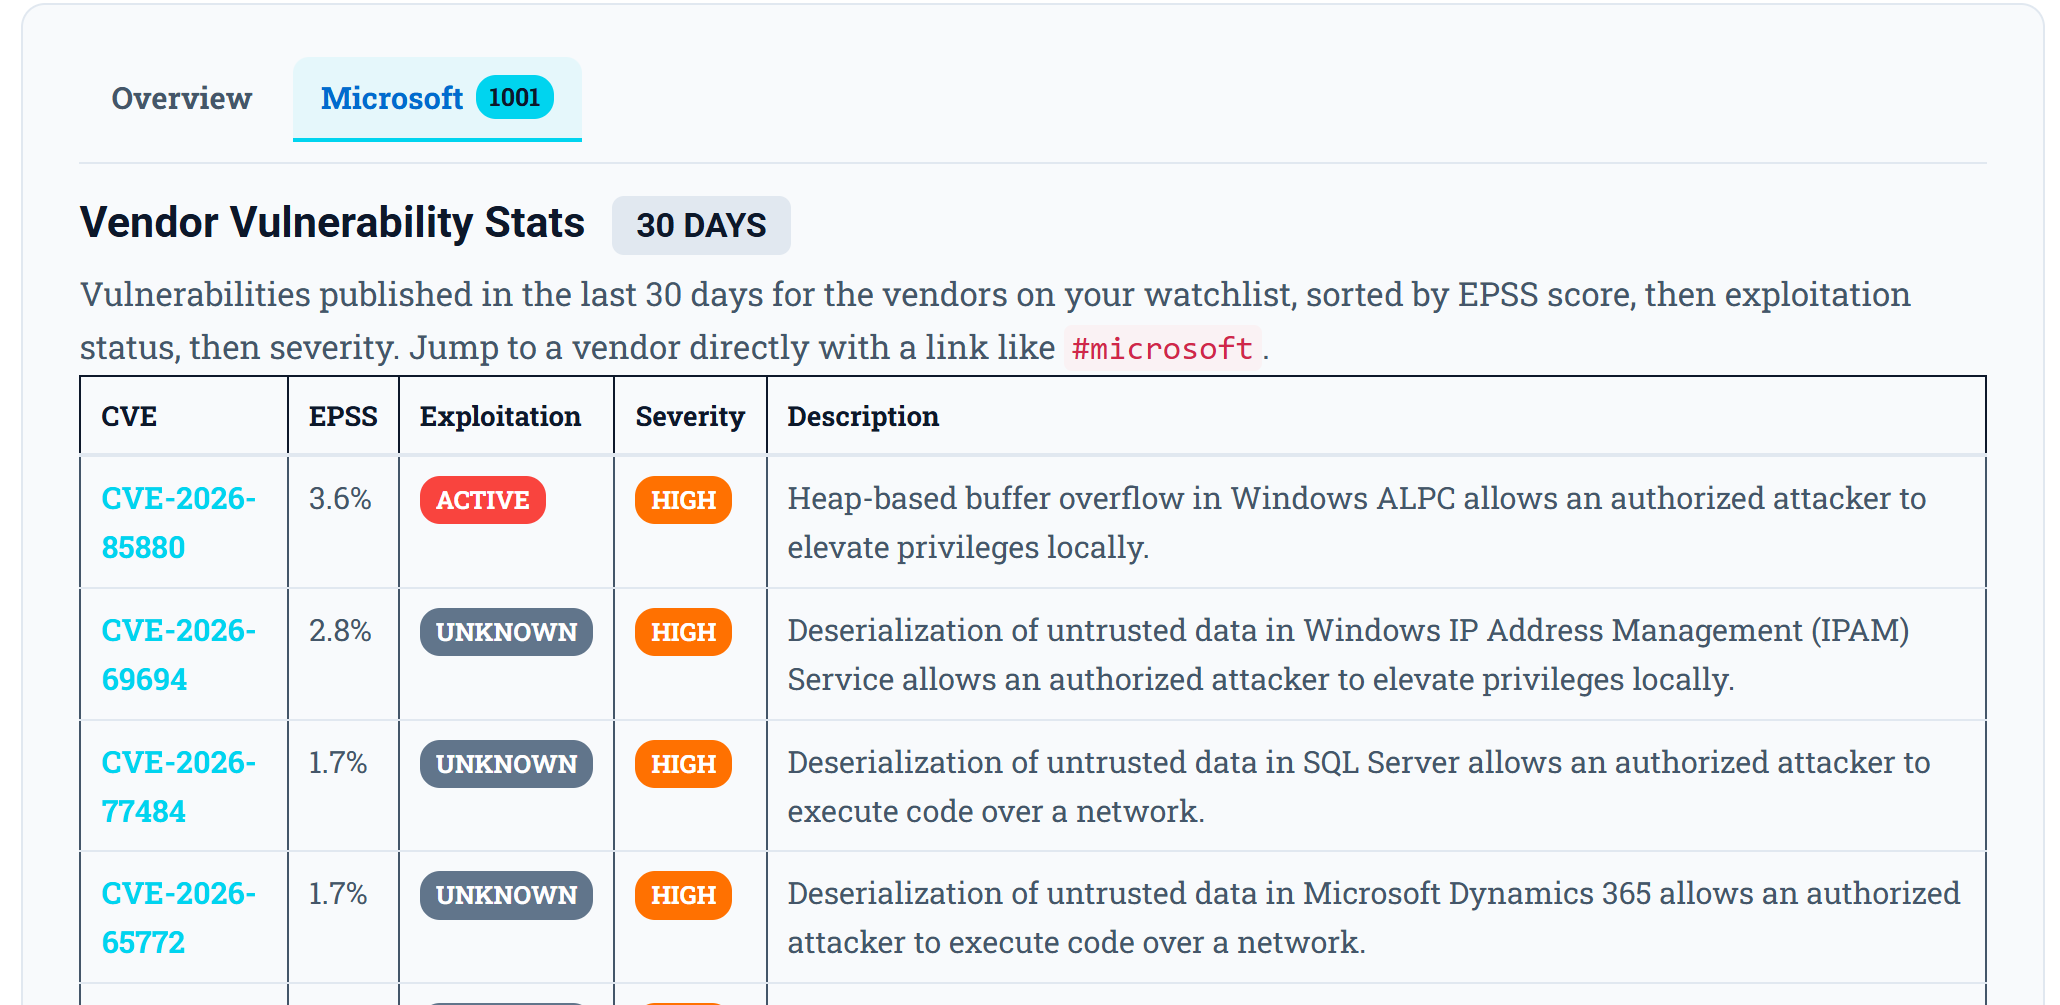
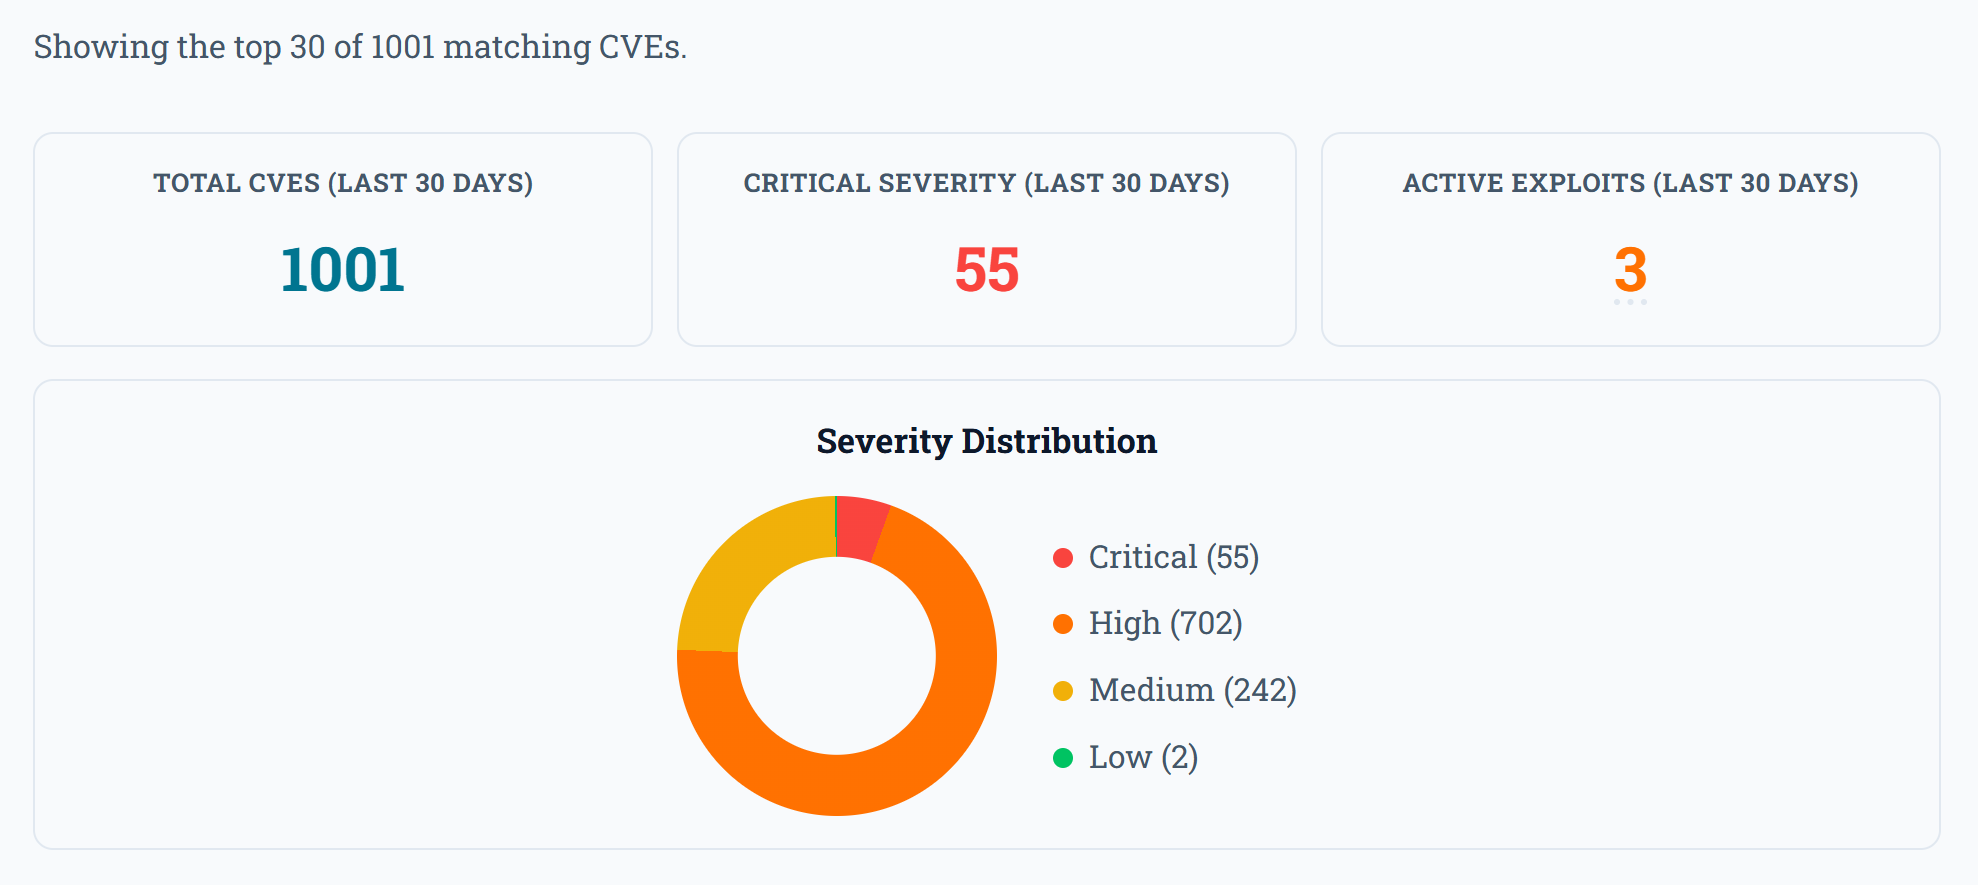
No vendor tab is selected by default — the page opens on a plain overview until you pick one.
Step 6: Read a CVE Detail Page
Clicking any CVE ID — from the stats table, an email, or the main CVE Watchtower list — opens its detail page. Here’s what each part means:
| Element | Meaning |
| Source badge (NVD / SA) | Where the data came from. “SA” marks a CVE the CVE Watchtower team added or enriched before the official record existed. |
| Severity Level | Critical / High / Medium / Low, plus the raw CVSS score out of 10. |
| Exploitation Status | ACTIVE (confirmed real-world exploitation) or “No confirmed exploitation yet.” |
| CVE Record Status | A purple R badge means “Reserved but Public”: the CVE ID is referenced in a public advisory, but the official CVE Record hasn’t been published yet — full CVSS/CPE data will appear once it is. |
| EPSS Score (30-day) | The probability of exploitation in the next 30 days, when available. |
| Root Weakness (CWE) | The underlying vulnerability class (e.g. SQL injection, use-after-free). |
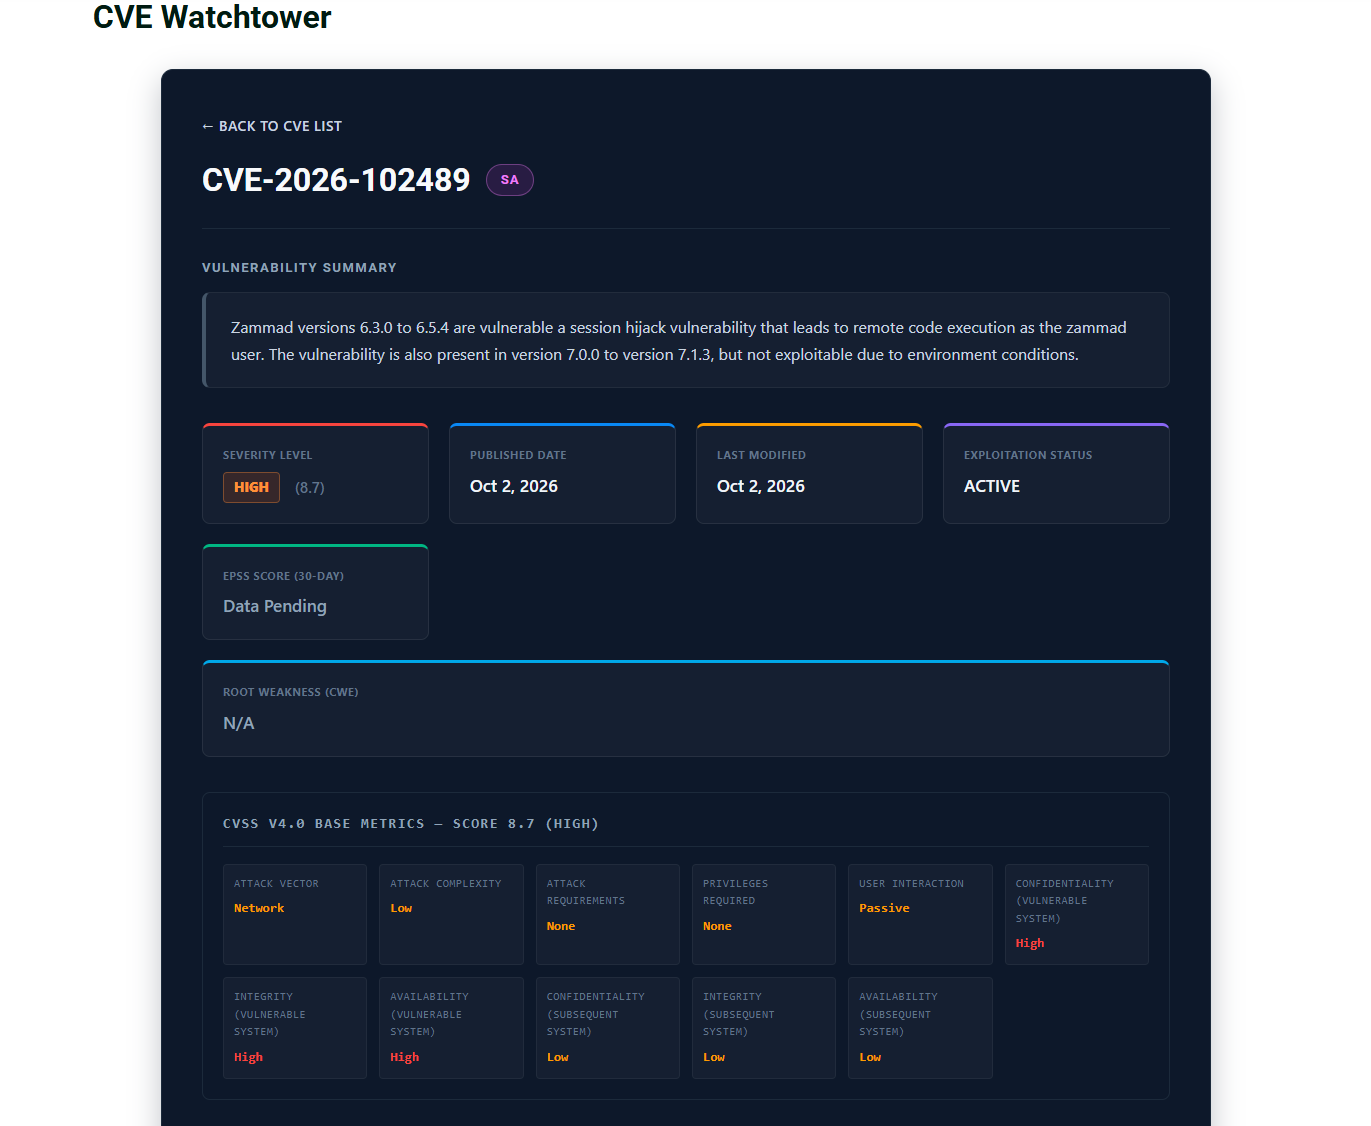
On the Free plan, a small number of admin-curated CVEs (marked “SA”) show a Premium Threat Intelligence upgrade prompt instead of the CVE ID and full description — upgrading to Pro or Team unlocks these.
Step 7: Understand Your Email Alerts
An alert email arrives whenever a watchlisted CVE matches one of the triggers from Step 4. Each CVE in the email is shown as a card with:
- A red 🔴 ACTIVE EXPLOITATION badge when exploitation status is ACTIVE.
- The CVE ID, severity, and a one- or two-sentence summary of the description.
- A View Threat Intelligence → button linking straight to the full detail page.
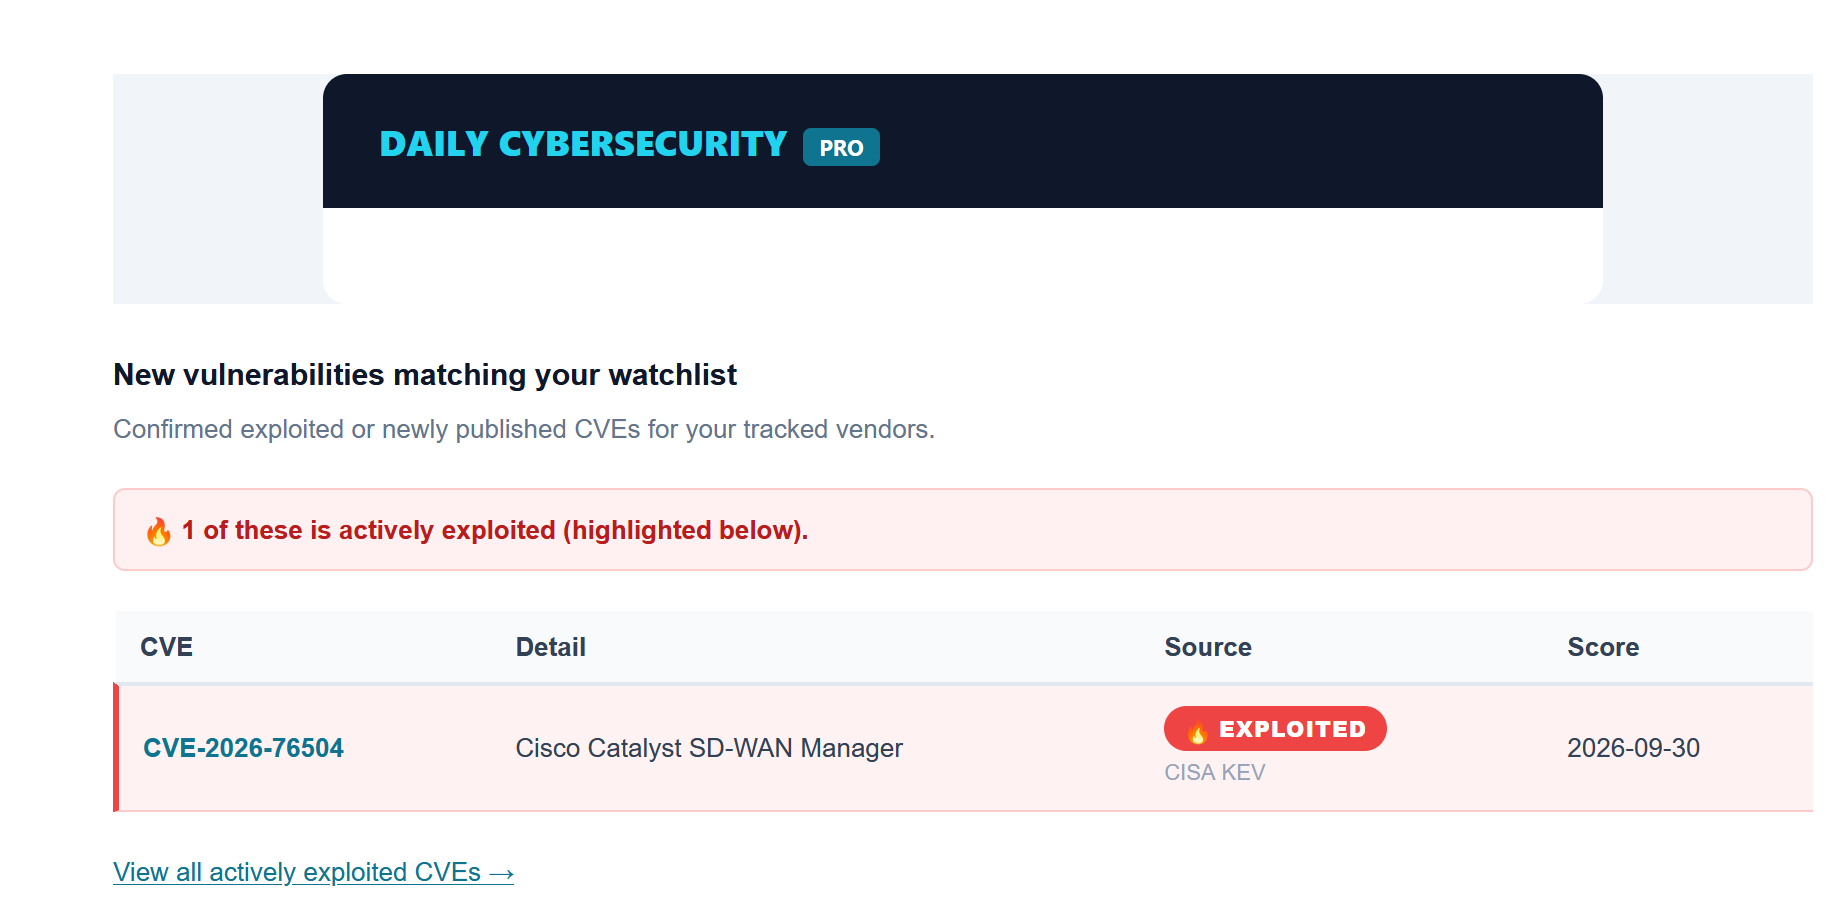
On the Free plan, if the matching CVE is one of the admin-curated “Premium Threat Intelligence” ones, the email shows only the vendor name and an Upgrade to Pro/Team button — the CVE ID and description are withheld the same way they are on the detail page.
Pro and Team subscribers also get a one-time welcome email listing their 10 most recent matching CVEs when their subscription starts, so there’s no need to wait for the first real alert to see the system working.
Troubleshooting
I’m not receiving any emails. Confirm your watchlist isn’t empty (Step 3) and that your EPSS/CVSS thresholds (Step 4) aren’t set so high that nothing qualifies. Also check your spam folder for the sender address.
A CVE I expected to see isn’t in my vendor’s stats. The stats panel only covers the last 30 days by publish date, and vendor matching relies on the CVE’s assigned CNA or its description mentioning the vendor — a CVE affecting your vendor’s product but assigned to a different CNA (e.g. a shared open-source library) may not always match.
A CVE shows “R” (Reserved but Public) instead of full CVSS data. This is expected: the CVE ID exists and has been referenced in a public advisory, but the official CVE Record hasn’t been published yet. Full data appears automatically once it is.
I can’t see the full details of an admin-added CVE. That CVE is part of Premium Threat Intelligence, available on Pro and Team. Upgrade from the Pricing page to unlock it.
Getting Help
Still stuck after working through Troubleshooting above? Reach out to CVE Watchtower support with:
- The email address on your account.
- Your plan (Free / Pro / Team).
- What you expected to see vs. what you saw — a screenshot helps.
📧 Still need help? Email ddos@securityonline.info and the CVE Watchtower team will get back to you.
Support Our Threat Intelligence
Find our zero-day alerts and CVE reports helpful? Support our work today and unlock a 100% ad-free reading experience!