AutoPentest-DRL: Automated Penetration Testing Using Deep Reinforcement Learning
AutoPentest-DRL is an automated penetration testing framework based on Deep Reinforcement Learning (DRL) techniques. The framework determines the most appropriate attack path for a given network and can be used to execute a simulated attack on that network via penetration testing tools, such as Metasploit. AutoPentest-DRL is being developed by the Cyber Range Organization and Design (CROND) NEC-endowed chair at the Japan Advanced Institute of Science and Technology (JAIST) in Ishikawa, Japan.
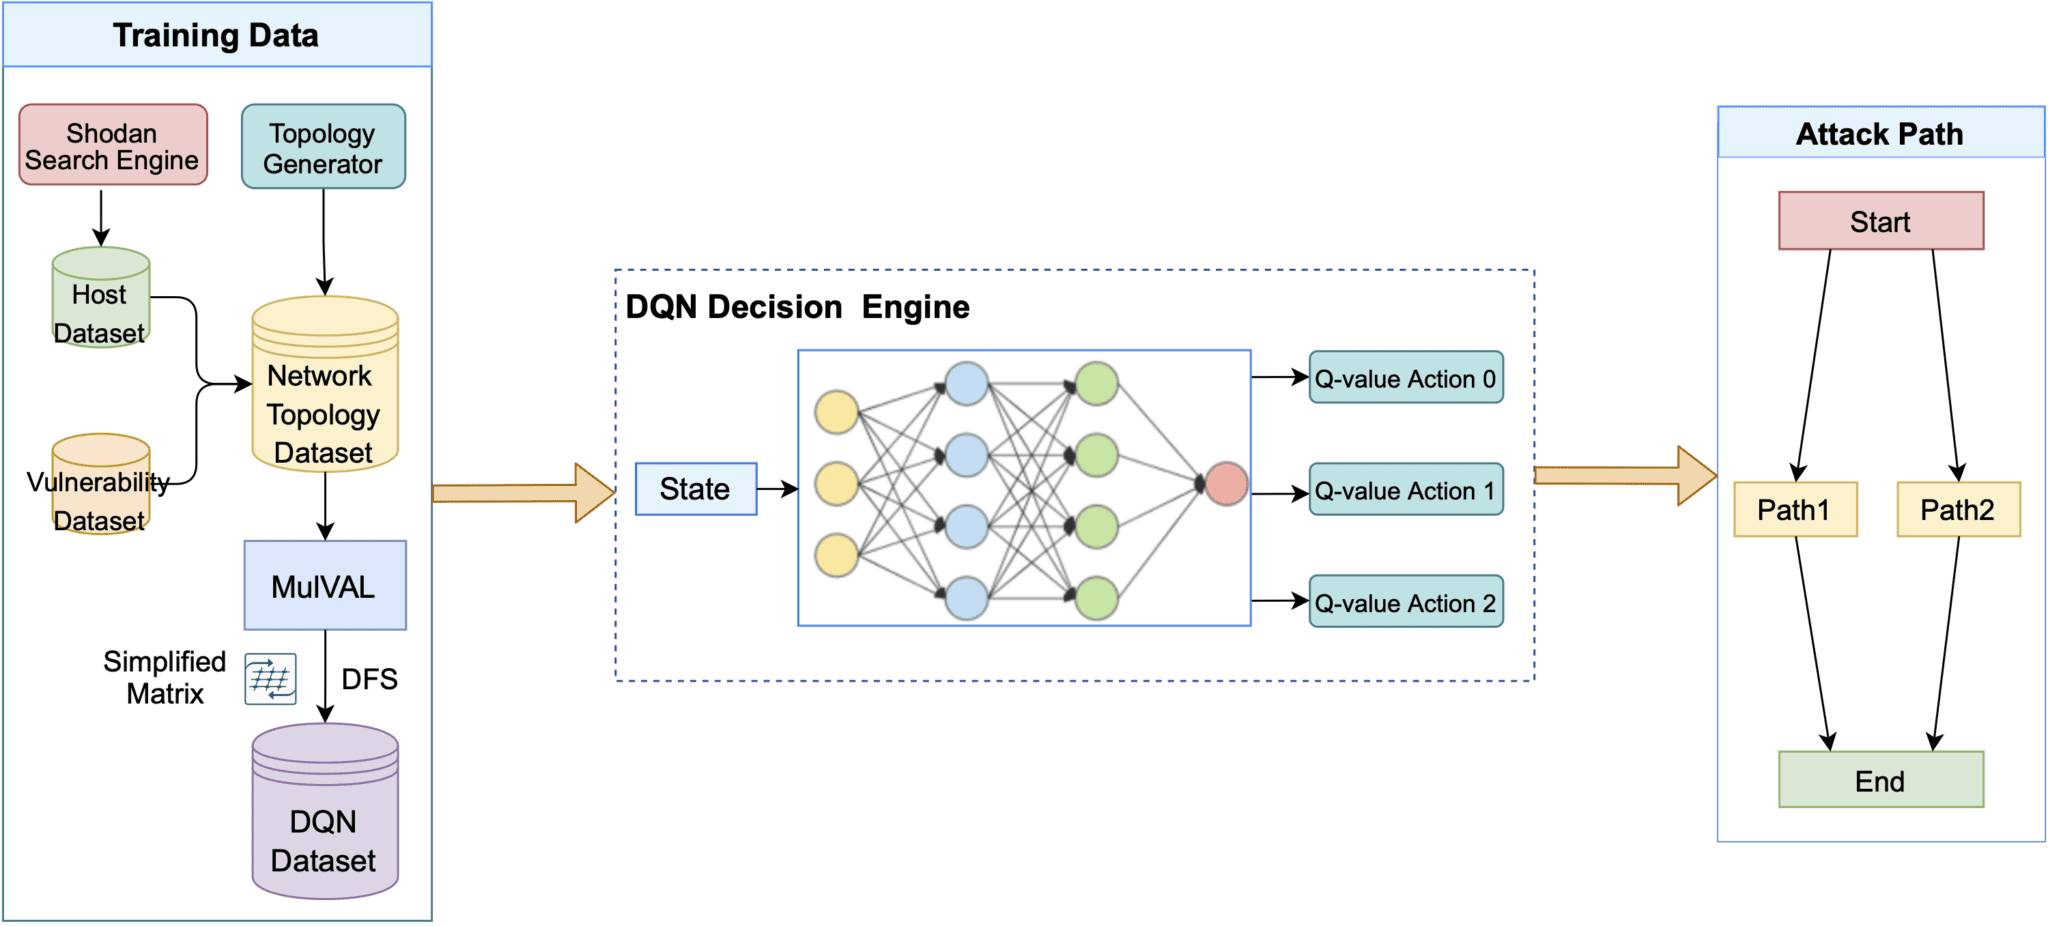
An overview of AutoPentest-DRL is shown below. The framework can use network scanning tools, such as Nmap, to find vulnerabilities in the target network; otherwise, user input is employed instead. The MulVAL attack-graph generator is used to determine potential attack trees, which are then fed in a simplified form into the DQN Decision Engine. The attack path that is produced as output can be fed into penetration testing tools, such as Metasploit, to conduct an attack on a real target network, or used with a logical network instead, for example for educational purposes. In addition, a topology generation algorithm is used to produce multiple network topologies that are used to train the DQN.
User Guide
AutoPentest-DRL has three operation modes that we explain below:
- Logical attack mode
- Real attack mode
- Training mode
Logical Attack Mode
The logical attack mode refers to the operation mode in which AutoPentest-DRL is used to determine the optimal attack path for a given logical network. The following command starts AutoPentest-DRL in this operation mode:
$ python3 ./AutoPentest-DRL.py logical_attack
The logical network topology used in this attack mode is described in the file MulVal_P/logical_attack.P, which includes details about the servers, their connections, and their vulnerabilities. This file can be modified following the syntax described in the MulVAL documentation.
In the logical attack mode, no actual attack is conducted, and only the optimal attack path is provided as output. By referring to the visualization of the attack graph that is generated by MulVAL in the file mulval_results/AttackGraph.pdf you can study in detail the attack steps.
Real Attack Mode
The real attack mode refers to the operation mode in which AutoPentest-DRL is used to actually conduct a penetration testing attack on a real network. This operation mode is semi-automatic, as it requires some advance preparation and configuration before use, as follows:
- Prepare the real target network, for instance by using virtual machines on which the desired services and vulnerabilities are configured.
- Describe the target network in the template MulVal_P/Template_P/attack_temp.P, including details about the servers and their connections. Vulnerability information is filled in automatically through the use of Nmap to scan the real target network.
- Specify the IP addresses of the servers to be scanned via Nmap in the file Nmap_scan/scan_config.csv, which contains the hostnames and their corresponding IP addresses separated by commas.
Once the target network is set up, the following command can be used to start AutoPentest-DRL in real attack mode and begin the Nmap scan:
$ python3 ./AutoPentest-DRL.py real_attack
Example attack
For the example network we provide, AutoPentest-DRL exploits three different vulnerabilities in order to execute an attack sequence on three servers, so that in the end a tunnel is opened between the “Internet” and “Workstation2” where a Trojan file is uploaded, as shown in the figure below.
In the real attack mode, once an attack path is computed, Metasploit is used to conduct an attack on the target network, and additional settings may be necessary, depending on the actions that Metasploit is to perform real target network. For example, the demo included in the current AutoPentest-DRL release requires the file /tmp/123.txt to be prepared in advance in order to successfully complete the last step of copying a Trojan file to the target machine.
Note that the current implementation of AutoPentest-DRL only includes support for several Metasploit actions, as needed for demonstration purposes. Therefore, in order to use AutoPentest-DRL with other vulnerabilities source code modifications are necessary. This limitation only applies to the real attack mode and is not an issue with the logical attack mode, which can be used with any vulnerability in the database.
Training Mode
AutoPentest-DRL needs a trained DQN model to operate, and the distribution already includes such a model, with the training having been conducted using the sample topology in the file MulVal_P/Template_P/basic_temp.P and the host and vulnerability information available in the Database/ directory.
The training mode is the AutoPentest-DRL operation mode that makes it possible to further train the DQN model, with the aim of improving the DQN Decision Engine performance. This mode only needs to be used when one wishes to do the training with other network topologies, other vulnerabilities, and so on.
The Database/ directory contains three types of data: host dataset, MS dataset, and CVE dataset. If you want to update any of them, you should use Shodan for the host dataset, Microsoft Security Response Center information for the MS dataset, and National Vulnerability Database information for the CVE dataset.
To start the training, after you update the topology file and/or the database, you should run the command below:
$ python3 ./AutoPentest-DRL.py train
Running this command updates the model that is stored in the file DQN/saved_model/dqn_model.pt. Should you wish to modify the DQN settings, for example, to change its architecture, you need to edit the file DQN/model/dqn_model.py, then redo the training. An overview of the training process is shown in the figure below.
Topology generation
One additional feature meant to improve the robustness of the DQN model is to generate network topologies based on a template, thus providing variation in the training process. To enable this functionality, you need to first install the tool named topology-generator into the directory Topology_generator/ by following the corresponding documentation.
Then you should check the topology generator template available in MulVal_P/Template_P/top_random.P and update it if necessary. Finally, you need to run the alternative training mode command shown below:
$ python3 ./AutoPentest-DRL.py tem_train
Install
Copyright (c) 2021 Cyber Range Organization and Design Chair, Japan

